Project Alex
Project Alex - Rigging in blender, IK bones, proper root motion and export to Unreal Engine
To create a locomotion system, we need animations and a skeleton that we export to Unreal Engine. Learning and rigging this character took me a lot of time due to learning, but now I understand reasonably well everything I'm doing. Before I started, I set some principles that the skeleton/rig must meet:
- Easy animation of root motion.
- Ability to separate root motion from the rest of the rig for creating traversal animations.
- IK and FK controls.
- Easy switching and snapping between IK and FK controls.
- Additional IK bones identical to those in UE5's mannequin for using procedural tools such as IK, orientation warping, stride warping, and slope warping.
- Additional prop bones for weapons and interactions.
Along the way, I encountered a lot of problems and had to learn many things to bring the skeleton to a usable state. Additionally, Blender with its archaic quirks did not make the task easier. To achieve this goal, I used the free Rigify plugin for Blender. Rigify is an addon that allows the generation of professional rigs for any character or animal. It turns out to be entirely modular, you just need to understand it. I succeeded thanks to the CGDive channel on YouTube. If you want to learn how to use Rigify with understanding, I recommend this course: link. However, it was not without problems. Besides creating the rig in Blender, I also faced issues with exporting the appropriate skeleton to Unreal, with the hierarchy, scale, root bone, and IK bones expected by Unreal.

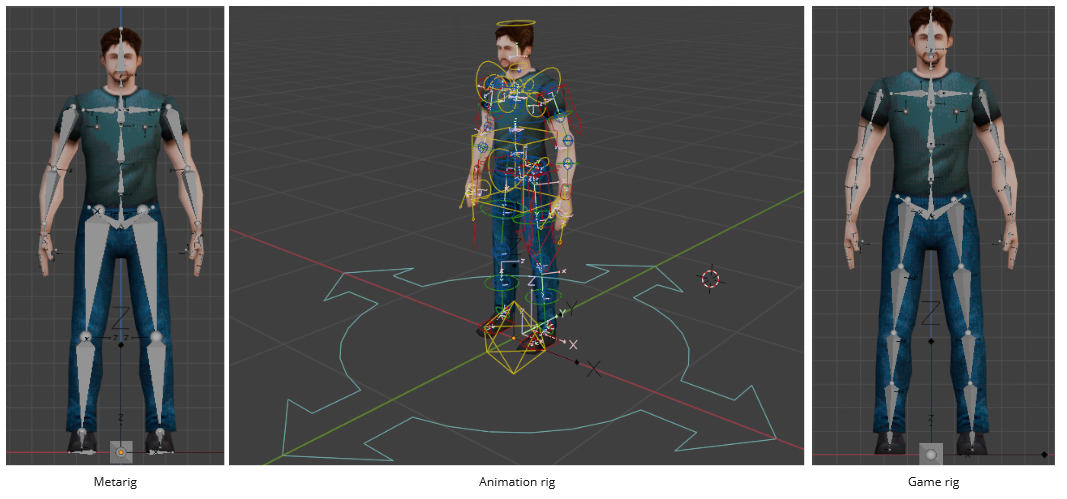
To achieve a skeleton similar to the UE Mannequin, several things had to be done - some of them seem to be hacks :D. In reality, creating this skeleton required three separate rigs:
- Metarig: Based on which Rigify generates a rig for animation with controls. After generation, it is hidden.
- Animation or control rig: This is where animation frames are actually created. It contains a lot of additional bones that should not be exported to the game engine. From this rig, animations are baked onto the game rig, which is then exported.
- Game rig: The actual rig that contains the baked animations from the animation rig and is exported together with the model to the game engine.
Now, the process can be divided into 3 stages:
- Metarig Creation
- Control Rig Generation based on Metarig and Basic Animation
- Export to the Game Engine and Testing
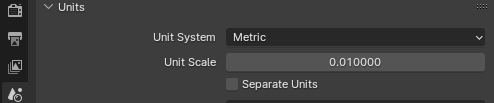
IMPORTANT NOTE BEFORE STARTING ANYTHING: I changed the world scale in Blender to 0.01. This adjustment is crucial due to the scale differences between Blender (Meters) and Unreal Engine (Centimeters). Without this change, every skeleton and animation would have a root scale of 100, which would completely disrupt every possible aspect, from animation and physics to root motion in Unreal Engine. After changing this value you will have to scale your armature in edit mode by x100 preferably with pivot being in the center of the scene.
Creating the Metarig:
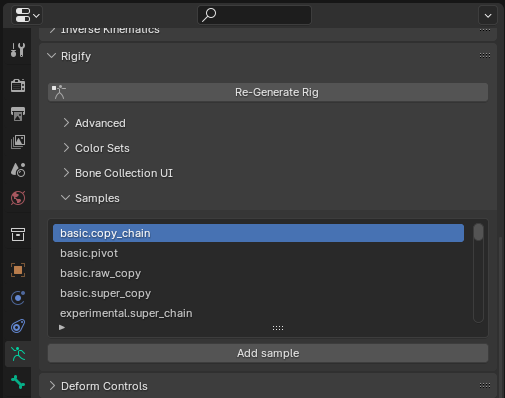
As mentioned earlier, Rigify proves to be highly modular, provided you know what to set up. The key is to use the provided samples appropriately or create your own and assign them the correct Rig Type. It's essential to edit bones in Edit Mode or, if edited in Object Mode, use "Apply Scale." Rigify requires a scale of 1 for proper functioning. Ready-made samples are used as building blocks to assemble your character, and Rigify then generates an animation rig from them.
First, I added the Basic Metarig Human, which I modified to suit my needs. I added a Root bone with the options below, and the "Register Parent with Tag" is to enable later space switching - changing the parent of bones at keyframes, a commonly used technique in animation.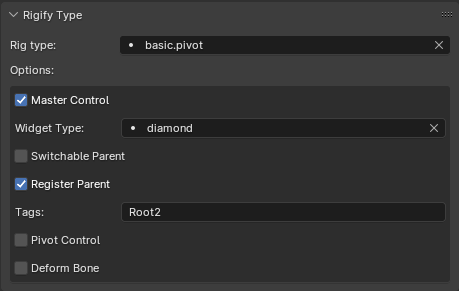
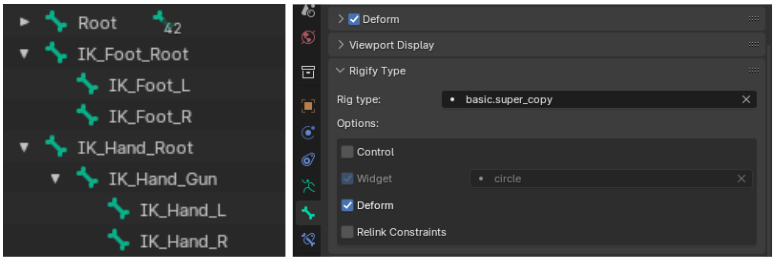
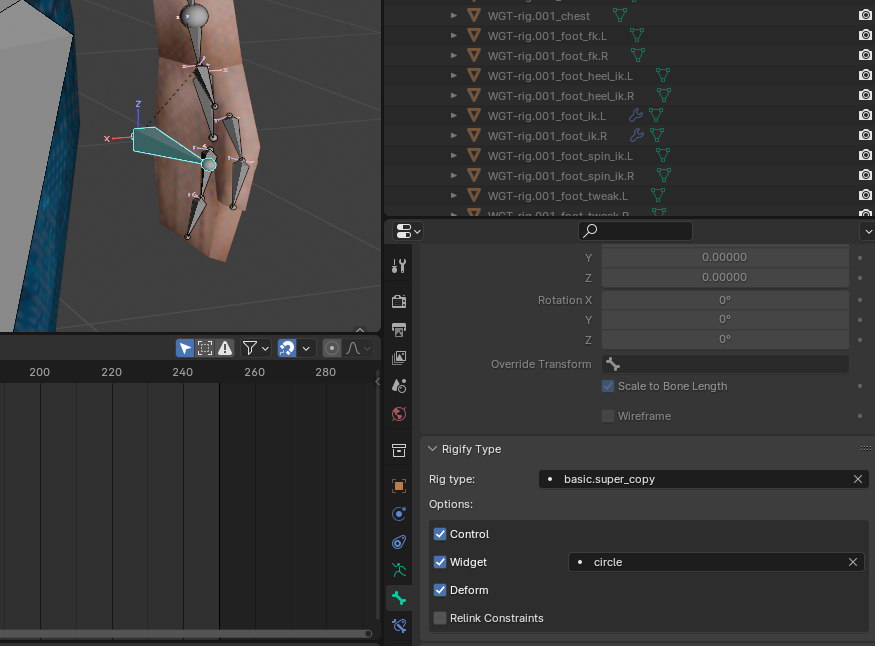
I added additional bones required by some Unreal Engine features, such as IK_Foot.L, IK_Foot.R, with appropriate rotations - IK_Foot_Root, IK_Hand_Root with the location and rotation of the world root, and IK_Hand_Gun with the location and rotation of hand.R. IK_Hand_L, IK_Hand_R have locations and rotations for their respective hands. All these bones are marked with the Rig Type "basic.super_copy." Rigify takes bones marked like this and copies them one-to-one to the generated rig. "Deform" is set to true so that during rig generation, Rigify recognizes them as bones needed for export to Unreal and adds them to the "Deform" skeleton. Later, after they have been added, I set "Deform" to false so that they don't deform the character - a bit of a hack. Below is the hierarchy of IK bones, parented to each other using "keep offset."
I added Prop bones and parented them to the hands to attach objects like a gun or flashlight and animate them.
Next, I parented all bones to their respective bones in Edit Mode to have the correct hierarchy of the deformed skeleton, similar to that in Unreal, during the generation of the animation rig. This resulted in the Metarig shown at the top.
Generating Animation Rig and Simple Animation:
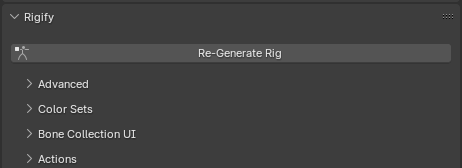
I generated the rig using the "Generate Rig" option by clicking on the armature tab in object mode on the Metarig. Thanks to the knowledge from CGDive, I encountered no errors. I then parented the model with automatic weights to the created animation rig.
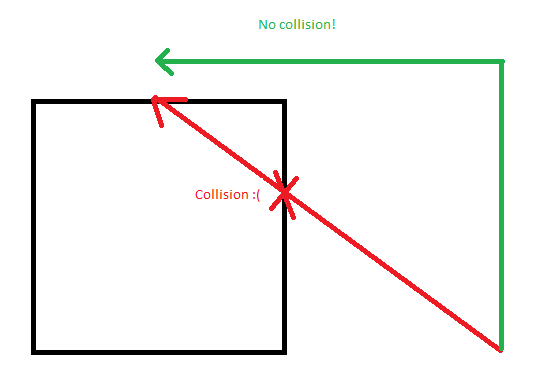
Next, I created a simple animation where I move the root and pelvis to later check in the engine if root motion works as intended. The root will control the character's capsule movement, while the pelvis will control the body. Thanks to the earlier mentioned space switching, we can separate the actual root from the character's movement. Imagine the character trying to "climb" onto a cube . If it moves straight, the root would "hit" the cube, causing the character to stop in the engine because the root bone controls the character's collision capsule. However, by first moving the root to the correct height and then forward, there won't be a collision. Later, we only need to adjust the character's animations so that they match the root's position at the beginning and end.

It's possible thanks to a magical button that recalculates bone positions in selected frames as if their parent were the specified bone. If the recalculation points to nothing (i.e., the world), the character will stay in place when the root moves. Then, we can animate the character to follow the root as desired.

Export to the Game Engine and Testing:
Alright, we have the animation, but how do we export them on the appropriate skeleton to the game engine? It turned out to be a significant problem, but I found a plugin also made by CGDive that allows extracting the game rig from the animation rig. However, the extracted rig still required adjustments. I found the plugin for free here. After installing and activating it, a new tab appears on the side. CGDive has a tutorial on it, making it easy to start using.

There are two fields, Control Rig and Game Rig, and a generate button below. In my case, the rig is already made, so the game rig field is filled, and the button shows "regenerate." If there's no game rig yet, you need to do two things:
- Input the control rig (our animation rig).
- Click "Generate Game Rig."
IN THE GAME RIG FIELD, YOU MUST ENTER THE NAME "Armature" - only in this case, after exporting the skeleton to unreal, will it recognize the first bone of armature as the root bone. If the game rig isn't named "Armature," unreal will recognize the armature OBJECT as the root bone, and the actual root bone will be its child. This will completely break the entire skeleton and all its animations. I don't understand why blender is so peculiar in some cases, but luckily i found information about it somewhere hidden away on the internet.
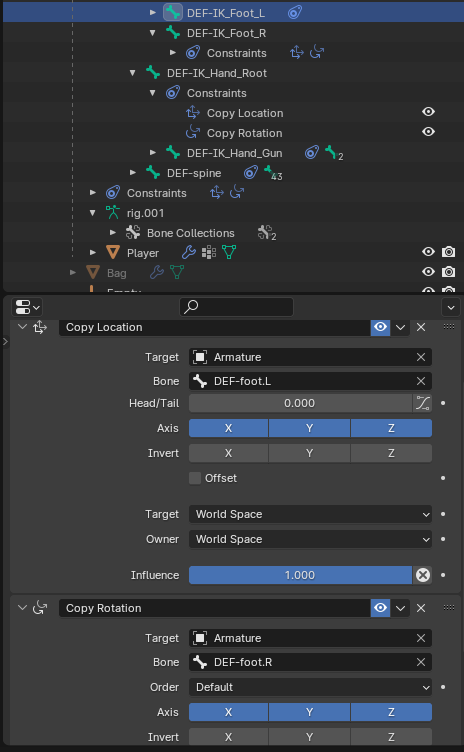
Once we generate our game rig, we need to enter its edit mode and adjust bone parenting in edit mode because they will be disconnected, and our hierarchy will be flat. Additionally, in pose mode, we need to add IK constraints to the additional bones that copy the locations and rotations of the bones they "correspond" to. For example, IK hands and gun copy from hands, IK foot copies from legs, and IK roots copy from the root. This is done because IK bones should follow the actual bones that deform the mesh.
Now that everything is ready, in the Action Bakery field, click "Load All" to see all our actions, select the animation we prepared on the control rig, and click "bake." The plugin should transfer the animation from the control rig to our actual skeleton so that we can export it together with the mesh and skeleton.
Let's check if the animation works and has been correctly baked onto our game rig. If the animation doesn't play, it's worth clicking "Unmute" on the panel above. If the plugin didn't do this automatically, or if we clicked mute earlier, the animation won't be visible because it's overwritten by constraints copying all bone locations from the control rig, which is standing still and hidden underneath. It works for me!

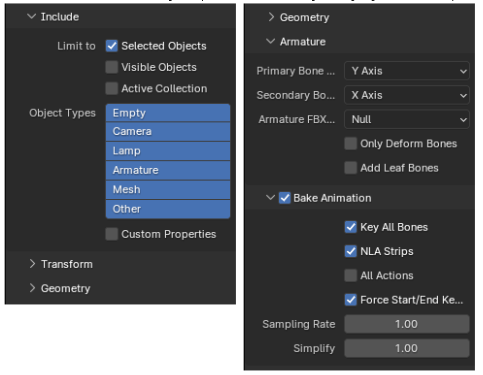
Now lets export! Switch to object mode, select the mesh and game rig, click file -> export. in armature, uncheck deform and set add leaf bones to false; we want to move the entire skeleton. in animation, I unchecked all actions because I only want to export specific ones, namely NLA strips set to true, as seen in the gif above - in this case, AS_TestAnim.001.
Open UE and import our FBX file by dragging it into the content window, click import all and enter our importred animation. The animation and skeleton appear well-set up, with the proper Root bone, IK bones, and Prop bones. Additionally, the red line indicates that root motion is working correctly.
I also checked if the IK bones work appropriately by using a retargeted walking animation from Mannequin. Its retarget is a bit awkward and has improperly positioned IK bones, but this issue won't occur when I create the animations myself. This illustrates that Unreal Engine features requiring these bones work. Now, I can use orientation warping to procedurally create strafing animations using only the forward walking animation without the need for additional assets - the magic of proceduralism! :D
That's all for this post. Creating and learning all of this took me over two weeks, posed a ton of challenges, and was pretty tiring but I'm happy with the results. I probably would have given up already if I hadn't started posting it. Next post should be about animations - but since I dont know how to animate Ill have to take a course at it, which i have no idea how long is gonna take so maybe ill post something different inbetween.
Thanks for reading! :D Take care.
Leave a comment
Log in with itch.io to leave a comment.